Monday, November 20, 2017

Cast Iron Pork Chop with Red-Eye Gravy


Serves: 2
Hands On Time: 45 minutes
Total Time: 45 minutes

Ingredients:

2 large bone-in pork chops, either porterhouse or center-cut
Salt and freshly ground black pepper
3 tablespoons vegetable oil
6 ounces country ham, cut into thin 2-inch-long strips
3/4 cup strong black coffee
1/2 cup chicken broth
1 tablespoon brown sugar, packed
2 tablespoons unsalted butter
2 tablespoons chopped Italian parsley

Instructions:

Heat a large cast iron skillet over medium-high heat. Season the pork chops on both sides with salt and pepper. Once the pan is hot, add the oil, swirl the pan, and then add the pork chops. Sear until browned and cooked through, about 8 minutes per side for medium.

Transfer the pork chops to a plate and add the country ham to the skillet. Cook, stirring frequently, until the ham is fragrant and much of its fat has rendered, about 5 minutes. Add the coffee and bring to a boil. Continue to boil until the coffee has reduced to about 1/3 cup.

Stir in the chicken broth and sugar, return to a simmer, and continue to cook for 5 minutes. Remove from the heat and stir in the butter and parsley. Spoon the gravy over the pork chops and serve.

Photo Credit: Ideabar Austin

About the recipe

Known for its sharp notes of black coffee, red eye gravy is traditionally served alongside country ham. This recipe captures the flavors of red eye gravy, but also combines both fresh and cured pork. Instead of serving the gravy atop the country ham, the ham is becomes part of the gravy, which we serve on top of a pork chop. The whole dish is best served with a side of grits or biscuits — or both.

Source:  southernkitchens.com

Sunday, July 30, 2017

Carrot Cake Cheesecake

Carrot Cake Cheesecake - copycat version from the Cheesecake Factory

It doesn’t get much better than Carrot Cake and Cheesecake and this version is the epitome of a show-stopping dessert.

If you looked up the word ‘show stopper’ in the dictionary, we’re pretty sure that this Carrot Cake Cheesecake would be pictured.

Is there anything better than the creamy combination of carrot and cheesecake? If you are yet to experience this heavenly dessert, you truly are missing out. This is the epitome of the ultimate dessert.
It’s surprisingly easy to make when you know how and we have included a video tutorial that will show you how.

How To Make Carrot Cake Cheesecake Video

We have also included a very popular copycat recipe for the Cheesecake factory Carrot Cake Cheesecake. You will not want to miss it. Be sure that you scroll our page all the way to the end so that you don’t miss a single great idea.

<iframe width="729" height="410" src="https://www.youtube.com/embed/DD5y0Ydjk68?list=PL52FF89E19B091CB5" frameborder="0" allowfullscreen></iframe>

It’s also recommended that you view the video so that you learn all the tips and tricks.Stephanie from ‘The Joy of Baking’ has put together a video that steps you through how to make your own Carrot Cake Cheesecake. Click ‘Play’ below above to view ⇑ 

Ingredients:
  • 1/2 cup pecan halves, plus more, chopped, for garnish
  • 1 cup all-purpose flour
  • 1 teaspoon baking powder
  • 3/4 teaspoon baking soda
  • 1 teaspoon ground cinnamon
  • 1/2 teaspoon ground ginger
  • Kosher salt
  • 1/2 cup vegetable oil
  • 1/2 cup sugar
  • 2 large eggs
  • 1 1/2 cups shredded carrot (2 to 3 medium carrots)
    Cheesecake:
Sour Cream Topping:
Directions:

For the carrot cake: Adjust an oven rack to the middle position and preheat to 350 degrees F. Spread 1/2 cup of the pecans on a rimmed baking sheet and bake until golden and toasted, 10 to 12 minutes. Allow to cool, and then finely chop.

Combine the pecans, flour, baking powder, baking soda, cinnamon, ginger and 1/4 teaspoon salt in a large bowl. Whisk together the oil, sugar and eggs in a separate bowl. Stir the carrots into the egg mixture. Fold the carrot-egg mixture into the flour mixture until just combined. Pour into an ungreased 9-inch springform cake pan and tap it on the counter to even out the batter. Bake until the cake bounces back when pressed and a toothpick inserted in the middle comes out clean, 20 to 25 minutes. Cool completely. The cake can be made a day ahead and stored in the pan.

For the cheesecake: Preheat the oven to 350 degrees F. Beat the cream cheese, sour cream and granulated sugar in a stand mixer fitted with a paddle attachment until smooth and creamy, about 5 minutes, scraping down the sides of the bowl as needed. Add the eggs one at a time, beating well after each addition. Beat in the flour, lemon zest and juice and vanilla, about 1 minute.

Pour the cheesecake mixture over the carrot cake. Wrap the bottom and sides of the pan with a large piece of foil. Put in a roasting pan or a large baking dish and fill halfway up the sides of the cake pan with water. Bake until the cheesecake is pale yellow and just jiggles slightly in the center, about 1 hour. Turn off the oven and let the cheesecake rest in the hot oven for 30 minutes. Remove, run a sharp knife around the edge and let cool completely on a rack. Cover and refrigerate 8 hours or overnight.

For the sour cream topping: Whisk together the confectioners' sugar, sour cream, vanilla and salt. Spread on top of the cheesecake; garnish with chopped pecans. Refrigerate for at least 30 minutes before serving. Cut into slices and serve.
 
Source: thejoyofbaking.com

Homemade Focaccia Bread

Homemade Focaccia Bread

You will never buy store bought Focaccia again, learn how to make your own version with this easy recipe that is delicious!

You’ll never go back to store-bought Focaccia Bread once you’ve tried making your own! It’s moist, chewy and full of flavor. The secret is leaving it to rise overnight.

It’s infused with Garlic and Herb Oil and you can use your favorite herbs. Serve it plain or with savory toppings. It’s also great served with Balsamic Vinegar and Olive Oil. You can even add some Dukkah.

You can experiment with this recipe and add all your favorite ingredients. Sundried Tomatoes, herbs, garlic, absolutely everything goes!  We’re sure that you are bound to have a few ideas of your own. 

Homemade Focaccia Bread Video

If you’d like to see how easy it is to make authentic Italian Focaccia, be sure to view the Jamie Oliver Foccacia Bread Video. It couldn’t be easier and it’s super delicious! Click ‘Play’ below ⇓

<iframe width="729" height="494" src="https://www.youtube.com/embed/UX6K-Z67vI4" frameborder="0" allowfullscreen></iframe>
 
Ingredients:
  • 1-3/4 cup warm water
  • 1 packet (2-1/4 teaspoons) active dry yeast (not instant active dry yeast or rapid rise yeast)
  • 1 tablespoon sugar
  • 5 cups all-purpose flour, spooned into measuring cup and leveled-off with a knife, plus more for kneading
  • 1 tablespoon + 3/4 teaspoon kosher salt, divided
  • 3/4 cup extra-virgin olive oil, divided, plus more for oiling the bowl and drizzling on top
  • 1 tablespoon chopped fresh rosemary, from several sprigs
  • Dipping Oil Recipe ⇓ via Young Living Essential Oils 
Dipping Oil For Italian Bread
Directions:

(Recipe from Bread Baker's Apprentice which is an amazing book which you need to own)
5 cups (22.5 ounces) Bread flour
2 teaspoons salt
2 teaspoon instant yeast
6 tablespoons olive oil
2 cups room temperature water
1/4 cup + 1/2 cup of herb oil (oil gently warmed with garlic and herbs)

DOUGH:

Stir together the flour, salt and yeast. Add the oil and water and knead with a dough hook for 5-7 minutes.  The dough with be smooth but fairly sticky. It will be sticking to the bottom of the bowl but should be clearing the sides of the mixing bowl.

Liberally sprinkle a surface with flour. Then flour your hands and transfer the dough to the floured surface. Dust liberally with flour and then pat into a large rectangle and let relax for five minutes.

STRETCH AND FOLD:

Pulling on each end of the dough stretch it to twice its size and the then fold it like a letter to return it to the original rectangle size. Lightly brush with oil, sprinkle with flour, then cover with plastic wrap and let relax for 30 minutes

Stretch and fold again. Let relax 30 minutes

Stretch and fold again. Cover and let rise on the counter for 1 hour.

DIMPLE AND STRETCH.:

Line a 17x12 baking sheet with parchment or tinfoil. (I used a smaller pan to get a slightly taller focaccia. If you want to use the focaccia as the base for toppings it's better to use the 17x12 to get a thinner loaf).

Spread the pan with 1/4 cup of herb oil then transfer the dough (maintaining it's rectangle shape) and spoon another 1/4 cup of oil on top. Use your finger tips to dimple and stretch the dough to fill the pan. If the dough keeps springing back and won't stretch let it relax for a few minutes before continuing.

FRIDGE RISE:

Loosely cover with plastic wrap and let rise overnight in the fridge

BAKING:

Remove the focaccia three hours before baking to allow it to come to room temperature and rise a bit more. Drizzle more oil on top (you can use all the remaining 1/4 cup if you like) and dimple and stretch the dough a bit further to completely fill the baking sheet.

Preheat the oven to 500

Three hours after removing the focaccia from the fridge place in the oven and TURN IT DOWN to 450.

Bake for 10 minutes, then rotate and bake for another 10 minutes. If you are adding cheese sprinkle it on now and then bake for a further five minutes. The bread should be golden brown. Remove from oven and transfer to a cooling rack to prevent the bread from over baking. Let cool for at least 20 minutes before eating.

Go to this page to see their tutorial on how to make the bread. Click Here

Source: clockworklemon.com

Lemon Meringue Pie Cheesecake Slice


When life gives you Lemons, why not make Lemon Meringue Pie Cheesecake Slice! This is an old time fave we just had to share  …

Our community is head over heels for Lemon Recipes and when we spied this amazing Lemon Meringue Cheesecake Recipe on one of our favorite Food Sites, Foodiful – we knew it was a winner!
In fact, we have spent many hours browsing their beautiful site. We were in complete awe with the various collections of recipes that they have. We particularly love their old fashioned food series.

Ingredients:
  • 250 g digestive biscuits, finely crushed
  • 125 g butter, melted
  • ¼ cup lemon curd
  • 500 g cream cheese, softened
  • ¾ cup caster sugar
  • 3 teaspoons gelatine dissolved in ¼ cup boiling water, cooled
  • 300 ml thickened cream
  • finely grated zest and juice of 1 lemon
  • Meringue

    • 3 egg whites
    • ¼ tsp cream of tartar
    • ¾ cup caster sugar
Directions:
  1. Line an 18 x 28cm slice pan with baking paper. Mix crushed biscuits and butter in a bowl. Press into base of pan. Chill for 20 min. Spoon lemon curd randomly over the base.
  2. Beat cream cheese and sugar in a bowl using electric beaters until smooth. Add cooled gelatine mixture and beat until just combined. Add cream, lemon zest and juice and continue beating until smooth. Spoon over the lemon curd base and smooth surface. Cover, chill for 4-5 hr until set or overnight if time permits.
  3. To make the meringue, beat egg whites and cream of tartar together until soft peaks form. Add caster sugar, 1 tablespoon at time, beating constantly until thick and glossy.
  4. Spoon meringue over the top of cheesecake to cover and use the back of a spoon to create peaks. Brown meringue with a blowtorch or place under a hot grill. Cut into slices to serve. Store in the fridge.
Source: foodiful.com

Tuesday, May 30, 2017

Roast Beef With Rosemary


Ingredients:
  • 1 sprig fresh rosemary
  • 1 2 ounce can anchovy fillets, drained
  • 1 clove garlic, peeled and smashed
  • 1 teaspoon freshly ground black pepper
  • 1 tablespoon red wine vinegar
  • Olive oil
  • 1 2 1/2 pound beef strip loin roast or top sirloin roast*
  • Fresh rosemary leaves
Directions:
  1. Remove leaves from the rosemary sprig. Place rosemary leaves, anchovies, garlic, and black pepper on a cutting board. Roughly chop mixture. Drag the flat, broad side of the knife across the mixture in one direction and then the other until it forms a smooth paste. Transfer to a small bowl. Stir in vinegar and enough olive oil to make a spreadable paste. Set aside.
  2. Trim most of the fat from the roast; score any fat that remains. Rub anchovy paste over beef. Tuck edges of the roast under and tie with kitchen string. Cover and chill at least 1 hour.
  3. Preheat oven to 500 degrees F. Place the roast on a rack in a shallow roasting pan. Insert a oven-going meat thermometer into center of roast. Roast, uncovered, for 15 minutes; reduce temperature to 350 degrees F. Roast for 45 to 60 minutes more or until the thermometer registers 135 degrees F for medium-rare. Remove roast from oven. Cover with foil; let stand 15 minutes. (The temperature of meat will rise to 145 degrees F after standing). Top with fresh rosemary leaves.

From the Test Kitchen:

Try substituting 1/4 cup purchased black olive tapenade for the anchovy paste. 

If you really love anchovies, double the ingredients for the paste and thickly coat the roast.

Source: bhg.com

Saturday, April 8, 2017

Easter Basket Cupcakes

Easter Basket Cupcakes

Gather the kids and make sweet, edible Easter baskets! 

Ingredients:


box Betty Crocker™ SuperMoist™ yellow cake mix
Water, vegetable oil and eggs called for on cake mix box
1 container Betty Crocker™ Whipped fluffy white frosting
Green-colored sour candy separated into strips
Jelly beans or other desired candies
Directions:
  • Heat oven to 350°F (325°F for dark or nonstick pans). Place paper baking cup in each of 24 regular-size muffin cups.
  • 2
    Make and bake cake mix as directed on box for 24 cupcakes. Cool in pans 10 minutes; remove from pans to cooling rack. Cool completely, about 30 minutes.
  • 3
    Frost with frosting. Use candy strips for handle on each. Decorate with candy as desired. Store loosely covered. 
     
    © 2017 ®/TM General Mills All Rights Reserved
Source:  bettycrocker.com

Easter Bunny Rabbit Cake

Easter Bunny Rabbit Cake

Bake up this easy bunny cake made with two cake rounds and some cupcakes for your Easter gathering. Learn to make this recipe with our how-to

Ingredients:

1         box Betty Crocker™ SuperMoist™ yellow cake mix
           Water, vegetable oil and eggs called for on cake mix box
           Tray or cardboard covered with wrapping paper and plastic food wrap or foil
1 1/2   containers Betty Crocker™ Whipped fluffy white frosting
5         large marshmallows
1         roll Betty Crocker™ Fruit Roll-Ups™ red chewy fruit flavored snack (any flavor) (from 5-oz box)  
2         M&M's™ chocolate candies blue
           Red string licorice
           Edible black pen
3        Bugles™ original flavor snacks
1        roll Betty Crocker™ Fruit Roll-Ups™ punch berry chewy fruit snack (from 5-oz box) Save $
3        green-colored sour candies, separated into strips
          Pink and white construction paper or craft foam sheets

Directions:
  • 1
    Heat oven to 350°F. (325°F for dark or nonstick pans). Grease two 6-inch round cake pans, one 10-oz custard cup, 2 regular-size muffin cups and 1 mini-sized muffin cup with shortening; coat with flour (do not use cooking spray).
  • 2
    Make cake batter as directed on box. Pour cake batter in custard cup, 2 muffin cups and 1 mini muffin cup filling about two-thirds full; divide remaining batter between cake pans.
  • 3
    Bake 6-inch cake rounds and custard cup 21 to 26 minutes, cupcakes 17 to 21 minutes and mini cupcake 10 to 15 minutes or until toothpick inserted in center comes out clean. Cool 10 minutes. Remove cakes from cake pans, custard cup and muffin cups; place rounded sides up on cooling racks. Cool completely, about 30 minutes. Using serrated knife, cut off rounded portion of cakes.
  • 4
    Place 6-inch cake, cut side down on tray; spread 1/3 cup frosting over cake. Top with remaining cake round, cut side up. Trim a small amount of edge off custard cupcake so it can stand on top of 6-inch cake round. Insert wooden skewer through top of head through cake rounds for stability; trim skewer as needed. Spread thin layer of frosting over side and top of layered cake and bunny head to seal crumbs. Use frosting to adhere cupcakes to front of 6-inch round cakes for feet. Use toothpicks to secure feet, if necessary; spread thin layer of frosting over feet to seal crumbs. Cut mini cupcake in half; place cut side down on top of cake for bunny arms. Cut 3 marshmallows in half lengthwise. Place 3 marshmallow halves, cut sides down, on top of each cupcake to make toes of feet. Place 1 full marshmallow behind cake to make bunny tail. Freeze cake 30 to 45 minutes to set frosting.
  • 5
    Spread remaining frosting over cake. Unroll red fruit flavored snack. Cut 2 large circles and 12 small circles out of snack. Press onto bottoms of bunny feet and front paws.
  • 6
    Place blue chocolate candies and red licorice on bunny face to make eyes and mouth. Cut remaining marshmallow in half crosswise. Using edible black pen, draw whiskers on each marshmallow half. Place on bunny face to make cheeks.
  • 7
    Unroll punch berry fruit flavored snack; cut into 3 sections. Wrap around Bugles™ snacks to make carrot shapes. Cut green sour candies in half crosswise; press into large end of each carrot and cut exposed end lengthwise into thirds to make greens on carrot.
  • 8
    Cut ears from construction paper; wrap ends that will be inserted into cake with plastic food wrap. Insert into cake. Remove ears, plastic wrap and toothpicks before serving. Store loosely covered. 
     
    Trademarks referred to herein are the properties of their respective owners.
    © 2017 ®/TM General Mills All Rights Reserved
     
Source: bettycrocker.com

Chocolate Easter Bunny Cake

Chocolate Easter Bunny Cake

This dark, moist chocolate cake tastes like it took hours to make, but it's ready in just about an hour. Raid the Easter baskets for the cute chocolate bunny decorations.

Ingredients:

Cake:

2        tablespoons cocoa
1        Betty Crocker™ SuperMoist™ dark chocolate or devil’s food cake mix
3        eggs
1/2     cup butter
1        cup water
1        cup good quality dark chocolate, chopped

Icing:

3        cups powdered sugar
3        tablespoons light corn syrup
1/4     cup heavy whipping cream
1/4     teaspoon peppermint extract
2        to 3 tablespoons of milk

Decor:

         Bunch fresh mint sprigs
2       large chocolate bunnies, unwrapped
         10-12 pastel malted candy eggs
Directions:
  • 1
    Heat oven to 350°F. (325°F for dark or nonstick pans). Generously spray 12-cup fluted tube cake pan with baking spray with flour. Sprinkle with cocoa to coat pans; tap to remove excess cocoa.
  • 2
    In a large bowl, beat cake mix, eggs, butter and water with electric mixer on low speed 30 seconds. Beat on medium speed 2 minutes, scraping bowl occasionally. Stir in chocolate.
  • 3
    Spoon batter into pan. Bake 35 to 40 minutes or until top springs back when touched lightly in center. Cool in pan 10 minutes. Place cooling rack or heatproof serving plate upside down over pan; turn rack and pan over. Remove pan. Cool completely, about 2 hours.
  • 4
    In medium bowl, beat powdered sugar, corn syrup, cream, and peppermint extract on low speed until blended. Beat on medium speed until smooth and creamy. Add just enough milk to the icing to make it thin enough to stick to a spoon, dripping off of the spoon slowly when tipped down toward bowl.
  • 5
    Spread icing onto cooled cake. Place a bunch of mint sprigs in the center of cake. Add a chocolate bunny in center of the mint sprigs. Press malted eggs around the top and sides of the cake. Press a second chocolate bunny onto the side of the cake. Garnish with additional mint sprigs, as desired. 
     
    © 2017 ®/TM General Mills All Rights Reserved
     
    By:  Brooke McLay
Source: bettycrocker.com

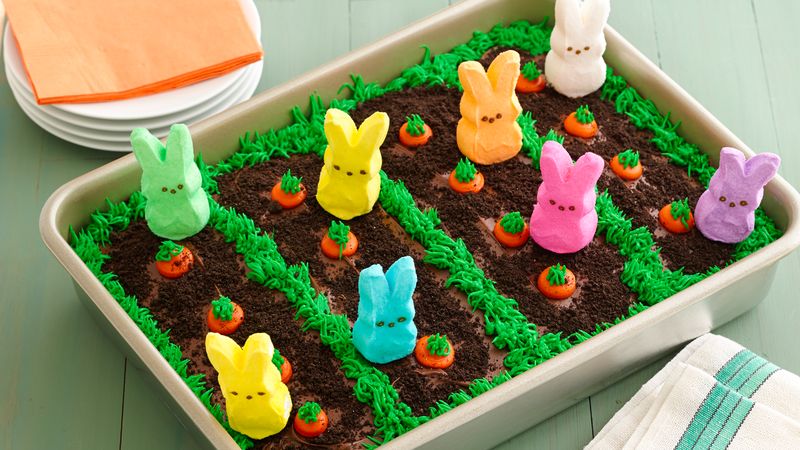
PEEPS® Easter Garden Cake

PEEPS® Easter Garden Cake

This festive bunny garden cake is quick and easy to make, thanks to the help of these adorable PEEPS® marshmallow bunnies.

Ingredients:

1        box Betty Crocker™ SuperMoist™ devil's food cake mix
          Water, oil and eggs called for on cake mix box
1        container Betty Crocker™ Rich & Creamy chocolate frosting
1        cup chocolate cookie crumbs
1        can (6.4 oz) Betty Crocker™ green decorating cake icing
8        to 12 PEEPS® marshmallow bunnies
1        can (6.4 oz) Betty Crocker™ orange decorating cake icing
Directions:
  • Heat oven to 350°F. Spray 13x9-inch pan with cooking spray. Make cake as directed on box for 13x9-inch pan. Cool in pan on cooling rack until completely cooled, about 30 minutes.
  • 2
    Spread chocolate frosting on top of cake; sprinkle with chocolate cookie crumbs. Use green icing to make garden rows, using photo as guide. Insert toothpick halfway into base of each PEEPS® marshmallow bunny. Insert bunnies, toothpick side down, into cake.
  • 3
    Use orange and green icings to make carrots on cake, using photo as a guide. Cut into 4 rows by 3 rows to serve. 
     
    PEEPS is a registered trademark of Just Born, Inc. All Rights Reserved. Trademarks referred to herein are the properties of their respective owners.
    © 2017 ®/TM General Mills All Rights Reserved
     
Source: bettycrocker.com

Friday, March 31, 2017

Apple Fritter Rings With Caramel Sauce

 
Apple Fritter Rings with Caramel Sauce
You won't be able to resist a serving of these Apple Fritter Rings with Caramel Sauce and the whole family will love them! This is such a popular and delicious treat. You absolutely need to make them!

Ingredients:
  • PREP:
  • COOK:
  • YIELD: 6 to 8 servings
  • 1 cup all-purpose flour
  • 1/4 teaspoon baking powder
  • 1/4 teaspoon ground nutmeg
  • 1/2 teaspoon cinnamon
  • 2 Tablespoons sugar
  • 1/4 teaspoon salt
  • 1 large egg
  • 1 1/4 cups buttermilk
  • 4 large apples, such as Fuji or Gala
  • Vegetable oil, for frying
  • Homemade or store-bought caramel sauce, for serving
Directions:

<iframe width="728" height="432" src="https://www.youtube.com/embed/pwGCBnFAP90" frameborder="0" allowfullscreen></iframe>

In a medium bowl, whisk together the flour, baking powder, nutmeg, cinnamon, sugar and salt. In a separate large bowl, whisk together the egg and buttermilk and then whisk the egg mixture into the flour mixture just until combined.
Slice the apples into 1/4-inch-thick rounds. Using the cookie cutters, cut each apple slice into rings, discarding the center core.
Add 3 inches of oil to a large heavy-bottomed pot set over medium heat. Line a sheet tray with paper towels.
When the oil reaches 350°F on your deep-fry thermometer, begin by dipping each apple slice in the batter, shaking off any excess then carefully lowering it into the oil. Add several apple slices to the oil but do not overcrowd the pot. Flip the apple slices occasionally so that they brown on all sides then using tongs, transfer them onto the paper towel-lined baking sheet. Repeat the battering and frying process with the remaining apple rings.
Serve the apple rings immediately with caramel sauce for dipping.
Kelly’s Notes:
You can coat the fried apple rings in cinnamon and sugar rather than serve them with caramel sauce.
It's important to shake off as much excess batter as possible to ensure the apple rings fry quickly.
The moisture in the apples results in the apple rings having a soft, pancake-like texture rather than a crunch.

For a tutorial of this recipe go to the website listed below. Also check out many other delicious recipes of hers while you are there.

Source:  justataste.com

Birds Nest Cake

Birds Nest Cake Tutorial

We have found you the ultimate Easter Cake and it looks great and is very easy to make.

Ingredients:

Carrot Cake Recipe:

2 cups of unbleached flour
2 teaspoons of baking powder
1 teaspoon of baking soda
3/4 teaspoon of salt
2 teaspoons of cinnamon
1/2 teaspoon of nutmeg
3/4 cup of white sugar
3/4 cup of packed brown sugar
3 eggs
1 1/2 cups of vegetable oil
2 teaspoons of pure vanilla extract
2 cups of grated carrots
1 cup of crushed pineapple
1/2 cup of chopped pecans (optional)

Directions:

Combine flour, baking powder, baking soda, salt, cinnamon and nutmeg in a medium bowl and whisk together well. Set aside.
In your mixing bowl beat together sugars, eggs, oil and vanilla until smooth. Gradually add flour and spice mixture until well combined. With mixer set on low, add carrots, pineapple and pecans.
Pour into prepared cake pans or cupcake pans.
Bake cakes at 350° for 40 minutes until cake tester comes out clean. For X-large cupcakes bake for approximately 28 minutes at 350° until cake tester comes out clean. Let cool in baking pans before removing to cooling racks.

For the tutorial go the the website shown below. Also check out their website for more wonderful recipes.

Source:  vanillabeanbaker.com

Bunny Butt Coconut Cake


Hop to it and make this sweet and silly bunny butt cake for your spring party. Learn to make this recipe with our how-to.

Ingredients: 
 
1        box Betty Crocker™ SuperMoist™ yellow or white cake mix
         Water, vegetable oil and eggs called for on cake mix box
         Tray or cardboard covered with wrapping paper and plastic food wrap or foil
1       container Betty Crocker™ Rich & Creamy vanilla frosting
         Red food color
1      large marshmallow, cut in half
3      cups shredded coconut
        Green food color
2      strawberry or cherry stretchy and tangy taffy candies (from 6-oz bag)
1     roll Betty Crocker™ Fruit Roll-Ups® punch berry chewy fruit snack (from 5-oz box) Save $
3     green-colored sour candies, separated into strips
      Construction paper
Directions:

Steps

  • 1
     
    Heat oven to 325°F. Grease 1 1/2-quart ovenproof bowl (8 inches across top) with shortening; coat with flour (do not use cooking spray). Lightly grease 3 muffin cups in regular-size muffin pan. 
     
  • 2
     
    Make cake batter as directed on box. Pour cake batter in 3 muffin cups, filling two-thirds full. Pour remaining batter into 1 1/2-quart bowl. 
     
  • 3
     
    Bake cupcakes 17 to 21 minutes, bowl 47 to 53 minutes or until toothpick inserted in center comes out clean. Cool 10 minutes. Remove cakes from muffin cups and bowl; place rounded sides up on cooling racks. Cool completely, about 1 hour. If necessary, cut off rounded tops of cakes. 
     
  • 4
     
    Spoon frosting into large bowl. Add red food color to make desired pink color. Place bowl cake on tray cut side down; spread 1/3 cup frosting over cake. Use frosting to adhere cupcakes to bowl cake for feet and bunny tail. Use toothpicks if necessary. Place marshmallow halves, cut sides down, on tops of 2 cupcakes to make heels of feet. Spread thin layer of frosting over side and top of cake to seal in crumbs. Freeze cake 30 to 45 minutes to set frosting.
  • 5
    Spread remaining frosting over cake. Sprinkle with 2 cups of the coconut; press gently to adhere. Shake 1 cup coconut and 3 drops green food color in tightly covered jar until evenly tinted. Surround bunny with tinted coconut. Use rolling pin to press strawberry candies into 2 large rectangles. Cut 2 large ovals and 6 small circles out of candy. Press onto bottoms of bunny feet, using frosting if needed. 
     
  • 6
     
    Roll up fruit snack to make carrot shapes. Cut green sour candies in half crosswise; press into large end of each carrot to make greens on carrot. Cut ears from construction paper; wrap ends that will be inserted into cake with plastic food wrap. Insert into cake. Remove ears, plastic wrap and toothpicks before serving. Store loosely covered.
Source: bettycrocker.com

Chocolate Buttermilk Easter Cake


I found this recipe on whoot.com and it looked so delicious and hard to make. So I went to the website that it requested mybuttoncake.blogspot.com.au   

I got the direction  and made it. It was easy once I followed the recipe but I did have some trouble when I was icing the cake. It looked somewhat like the picture, but the cake was delicious.

Go to their website listed above and see this recipe and follow other recipes that they have.

Ingredients:

For cakes:

Recipe from Donna Hay

1 cup water
120 gms butter, chopped
4 tablespoons cocoa, sifted
2 cups plain flour, sifted
1 tsp bicarbonate of (baking) soda, sifted
2 cups caster sugar
2 eggs
1/2 cup buttermilk
1/2 tsp ground vanilla bean


For filling:

50 gms butter, at room temperature
250 gms cream cheese
1 cup icing sugar, sifted
1/4 cup cocoa, sifted

For chocolate buttercream:
500 gms butter, at room temperature
1/2 cup cocoa
2 cups icing sugar

To decorate:
350 gms fondant
Desired food colourings and sugar decorations
Directions:

<iframe width="728" height="432" src="https://www.youtube.com/embed/vZHM9ti-lbg" frameborder="0" allowfullscreen></iframe>
Preheat oven to 150C.

For your decorations, form two-thirds of the fondant into a large ball to form your rabbit's bottom, then make a small ball for it's tail. Create two rabbit feet, using a scalpel or small knife to create his toes. Colour a small amount of remaining fondant grey - form shapes for your rabbit's feet pads. Colour remaining fondant green and slice into grass blades or various lengths and widths. Allow to dry on a sheet of baking paper. 

For the cakes, place the water, butter and cocoa in a saucepan over medium heat and stir until the butter has melted. Place the flour, bicarbonate of soda and sugar in a bowl, add the cocoa mixture and whisk to combine. Add the eggs, buttermilk and vanilla and whisk to combine.

Divide mixture between 4 lightly greased 20cm round cake tins lined with non-stick baking paper. Bake for 40 minutes or until cooked when tested with a skewer. Allow to cool in the tins for 5 minutes. Turn out onto wire racks to cool completely. Stack two cooled cakes on top of eachother (with baking paper in between each layer to prevent sticking) and with a small, sharp knife, cut a semi-circular hole (about 3 cms deep and 7cm wide) into the cakes - this will form the burrow for your Easter bunny. Refrigerate until needed.

For the cream cheese filling, place the butter and cheese in the bowl of an electric mixer and beat for 6 - 8 minutes or until pale and creamy. Add the icing sugar and cocoa and beat for a further 6 - 8 minutes or until light and fluffy. To assemble, place bottom layer (the layer that has the base of the already cut burrow) on a serving plate and thinly spread with one quarter of the frosting. Repeat with remaining layers, then use any left over frosting to fill in gaps between layers. Refrigerate for an hour.

For chocolate buttercream, beat butter in the bowl of an electric mixer until smooth and pale. Add cocoa and beat until combined. With motor running on a low speed, gradually add icing sugar, increasing speed to high between additions. Stop when mixture is light and fluffy, but holds it's shape - you may not need all of the icing sugar. 

Remove cake from fridge and very cover very thinly in a layer of buttercream. Chill for 30 minutes. 

Once crumb coat of buttercream has cooled, coat cake and burrow liberally with buttercream - you can be messy with this part. Vertical strokes will make it look more tree-like, and remember to add rings to the top of the tree stump. Add roots around the base of tree. Insert bunny into the burrow, adding his tail and feet, using a paintbrush dipped in water to secure. Decorate tree with grass, flowers and Easter eggs as you like. 

Standing over twenty centimeters tall, this proud, four-tiered chocolate cake means business, was incredibly heavy and could serve twenty, quite honestly. But the cake itself is lovely and moist, not overly sweet, and stores incredibly well. I made my cakes a few days in advance and kept them in the fridge for three days before decorating: you would never have known. 

The original cake recipe called for two 12cm split cakes, resulting in a much smaller four tiered cake, but I have doubled all quantities. 

Curry Brown Rice and Coconut Salad

curry brown rice and coconut

Coconut milk, peanut butter and lime make this rice salad a powerhouse of flavor!
Prep: 15 minutes
Cook: 20 minutes
Total: 35 minutes

Ingredients:
  •  
Directions:
  • In a saucepan, combine the rice, coconut milk and water. Bring to a boil, then cover and reduce heat to low. Simmer for 15 to 20 minutes, or until the rice has absorbed all of the liquid. Set aside to cool down.
  • In a small bowl, stir together the lime juice, peanut butter, sesame oil, curry powder and garlic. Taste, and adjust the flavor of the dressing to your liking.
  • When the rice has cooled, stir in dressing, coconut, raisins and almonds. Refrigerate for 1 hour.
Source: kroger.com

Cucumbers With Spicy Peanut Dressing

Cucumbers with Spicy Peanut Dressing

This cool cucumber salad is addictive with crushed red pepper and sesame oil!
Prep: 15 minutes
Total: 15 minutes

Ingredients:
  •  
  •  
  •  
  •  
Directions:
  • Peel alternating strips of cucumber the skin away, leaving some green. Cut the cucumber on the diagonal into thin slices.
  •  
    Mix the peanut butter with the broth, salt, sesame oil, and red pepper flakes into a smooth, thin paste.
  • Just before serving, mix the peanut dressing with the cucumber slices. Serve cold.
Source: kroger.com