Showing posts with label Christmas. Show all posts

Wednesday, September 21, 2016

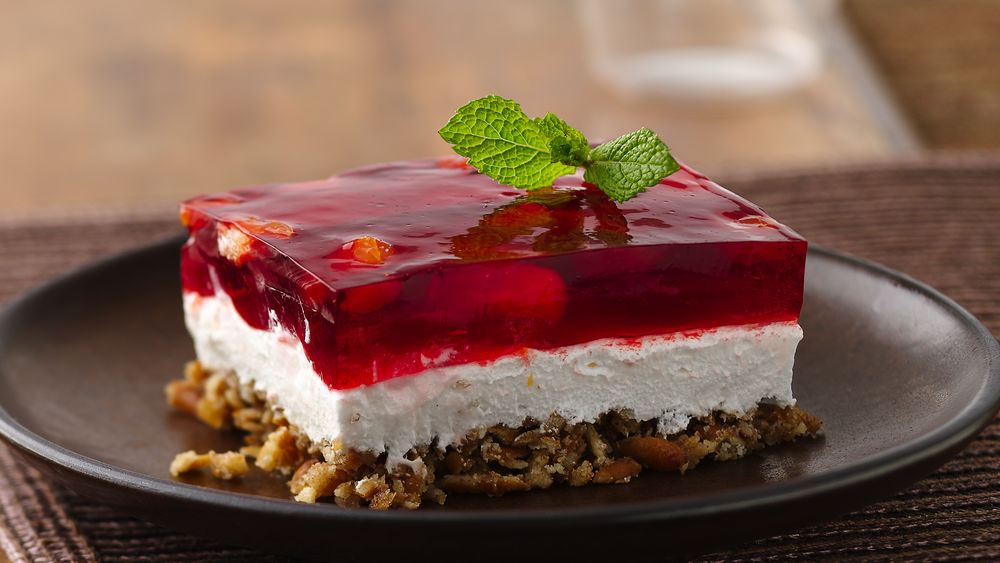
Gelatin Pretzel Salad Dressed Up For Thanksgiving

Gelatin Pretzel Salad Dressed Up for Thanksgiving

Enjoy this creamy pretzel salad with cranberry-flavored gelatin - perfect for Thanksgiving side or dessert.
  • 20 min prep time
  • 10 hr 20 min total time
  • 11 ingredients
  • 16 servings
Ingredients:
2 1/2     cups pretzel sticks
3          tablespoons packed brown sugar
1/2       teaspoon pumpkin pie spice
2/3       cup unsalted butter, melted
2          cups boiling water
2          packages (4-serving size each) cranberry-flavored gelatin
1 1/4    to 1 1/2 cups cold water
1         can (11 oz) mandarin orange segments, drained, juice reserved
1         package (8 oz) cream cheese, softened
1        cup granulated sugar
1       container (8 oz) frozen whipped topping, thawed
Directions:
  • 1. Heat oven to 350°F. Spray 13x9-inch (3-quart) glass baking dish with cooking spray.
  • 2. Place pretzels in resealable food-storage plastic bag; smash with rolling pin or flat side of meat mallet until crushed. In medium bowl, mix crushed pretzels, brown sugar and pumpkin pie spice. Stir in butter. Press mixture onto bottom of baking dish. Bake 9 to 11 minutes or until set. Cool on cooling rack.
  • 3. Meanwhile, in large heatproof bowl, pour boiling water on gelatin; stir until gelatin is dissolved. Add enough cold water to reserved juice to equal 2 cups; stir into gelatin. Refrigerate until partially set, about 1 hour 45 minutes.
  • 4. In medium bowl, beat cream cheese and granulated sugar with electric mixer on medium speed until light and fluffy. Fold in whipped topping. Spread mixture evenly over pretzel crust.
  • 5. Finely chop mandarin orange segments; gently stir into partially set gelatin. Carefully pour over cream cheese layer. Refrigerate 8 hours or overnight. Cut into squares.
Source:  pillsbury.com

Saturday, December 19, 2015

Roasted Turkey With Smoked Paprika


Smoked Paprika adds sweet, smoky flavor and beautiful color to roasted turkey. Everyone will be thankful for this centerpiece of the holiday table.

Ingredients:


Serves: 15
Directions:

20 mins Prep time 3 hrs 30 mins Cook time
  • Place oven rack in lowest position. Preheat oven to 325°F. Place roasting rack in shallow roasting pan. Mix first 6 ingredients in small bowl
  • Place turkey, breast-side up, in prepared pan. Sprinkle 1 tablespoon of the seasoning mixture inside turkey. Stuff with celery, onion, orange and bay leaves. Brush turkey breast with oil. Spread remaining seasoning mixture over entire surface and under skin of turkey. Add stock to pan; cover loosely with heavy duty foil
  • Roast 1 hour. Remove foil. Roast 2 to 2 1/2 hours longer or until internal temperature reaches 165°F (175°F in thigh), basting occasionally with pan juices. Remove turkey from oven. Let stand 20 minutes. Transfer to platter or carving board and slice. Reserve pan juices to make gravy or to serve with turkey

Cooking Tip:

Test Kitchen Tip: For easy cleanup, line roasting pan with heavy duty foil.

Source: McCormick.com

Wednesday, November 4, 2015

Mini Gingerbread House

Mini Gingerbread House

This Mini Gingerbread House is a cracker of an idea and will look fabulous on your Christmas Table! The kids will love to help make and decorate one.

Ingredients:

Royal Icing
quart size zip lock bag(to pipe on icing)
graham crackers
candy to decorate your house
cardboard wrapped in foil(for the house to sit on)
crunchy oat squares(thatch roof..this is optional)

Directions:

Begin your project with a piece of cardboard covered in foil for your base. I cut the graham crackers with a sharp knife in the shapes shown in the photos. I always use royal icing to “glue” the house base to the platform because it dries VERY hard. You can put your icing into a quart sized freezer bag and snip off a small corner of the bag for easy application. The Recipe for Royal Icing is included in the package of Wilton Meringue Powder. You can buy meringue powder at Michael’s. If you can’t find meringue powder, just google a recipe for a similar icing that calls for egg whites.  Assemble the house with royal icing. You can see how we assembled the house in the photos below.  Add your roof and let your house sit for a little bit to dry. Now it’s time to decorate!  There are really no limits to what you can use to accessorize your house!  I recommend spending a moment on the candy isle for inspiration!

Click Here to visit their website to check out other great ideas.

Source: http://kellymoorebag.com

Monday, December 1, 2014

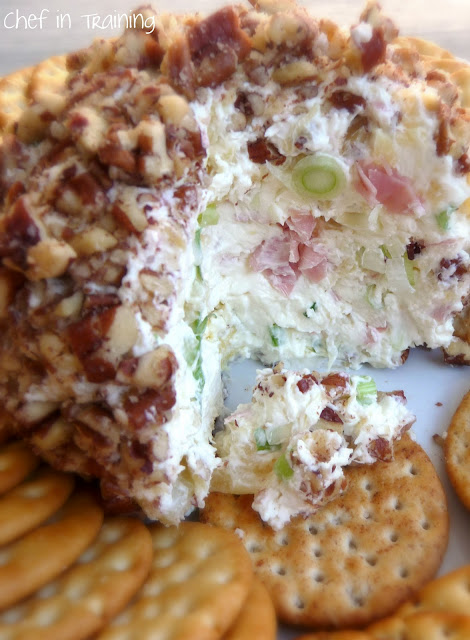
Pineapple Cheese Ball


This Cheese ball is a crowd favorite and so easy to make!

Ingredients:
  • 1-1/2 packages (12 oz) cream cheese
  • 1 small can crushed pineapple (well drained)
  • powdered sugar (to taste- approximately 2-3 Tbsp.)
  • green onion (optional-to taste, approximately 2 Tbsp.)
  • chopped ham (optional-to taste, approximately 2-3 Tbsp. I used deli meat ham)
  • chopped pecans (about 1 cup worth)
Directions:
  1. Combine all ingredients together.
  2. Mash into a ball and chill.
  3. Roll in crushed pecans.
  4. Refrigerate until served. Serve with crackers.
Source: chef-in-training.com

Holiday Tree-Shaped Cheese Ball

Holiday Tree-Shaped Cheese Ball
An easy, eye-catching way to serve a holiday cheese ball. The best news? You can make it up to a month in advance!
  • Prep Time: 20 minutes
  • Total Time: 4 hour 20 minutes
  • Servings: 7
Ingredients:

3        packages (8 ounces each) cream cheese, softened
4        cups shredded Cheddar cheese (16 ounces)
2        tablespoons basil pesto
1        tablespoon grated onion
1/4     teaspoon yellow mustard
          Red pepper sauce
1/4    cup finely chopped parsley or cilantro
1/4    cup pine nuts or sliced almonds
2       tablespoons chopped red bell pepper
         Piece of lemon peel, if desired
         Assorted crackers, if desired
Directions:
  • Stir together cream cheese and Cheddar cheese; divide in half. Stir pesto into 1 half; stir onion, mustard and 2 or 3 drops pepper sauce into other half. Cover each half; refrigerate about 4 hours or until firm enough to shape.
  • Place cheese mixtures on cookie sheet. Shape each half into cone shape to look like a pine tree.
  • If desired, wrap each tree, label and freeze up to 1 month. Twelve hours before serving, remove trees from freezer. Thaw in wrapper in refrigerator.
  • Just before serving, roll trees in parsley, pressing it evenly onto trees. Press pine nuts onto trees in string form for garland. Press bell pepper pieces onto trees for ornaments. Top each tree with star shape cut from lemon peel. Serve with crackers.
Source: tablespoon.com

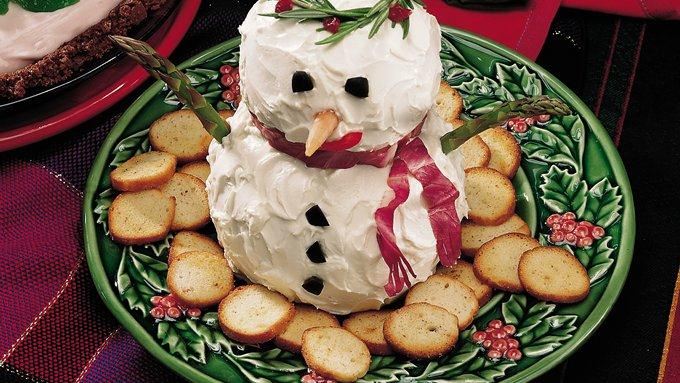
Make-Ahead Snowman Cheese Ball

Make-Ahead Snowman Cheese Ball
All holiday appetizers should be this fun! This adorable snowman is made of a delicious spread of seasoned cream and Cheddar cheeses.
  • Prep Time 10 minutes
  • Total Time 4 hour 10 minutes
  • Servings 7
Ingredients:

3        packages (8 ounces each) cream cheese, softened
4        cups shredded Cheddar cheese (16 ounces)
2        tablespoons basil pesto
1        tablespoon grated onion
1/4     teaspoon yellow mustard
2       drops red pepper sauce
1       container (4 ounces) whipped cream cheese, softened
         Decorations (see Success Hint), if desired
         Assorted crackers, if desired
Directions:
  • Mix 3 packages cream cheese and the Cheddar cheese; divide into 3 equal parts. Combine 2 parts to equal two-thirds of mixture; mix in pesto. Mix onion, mustard and pepper sauce into remaining one-third mixture.
  • Cover each cheese mixture and refrigerate about 4 hours or until firm enough to shape. Shape each cheese mixture into ball. Wrap each ball, label and freeze.
  • About 12 hours before serving, remove balls from freezer. Thaw in wrappers in refrigerator.
  • Arrange balls on serving plate with smaller ball on top for head of snowman. Frost snowman with whipped cream cheese before serving. Decorate as desired. Serve with crackers. Store covered in refrigerator.
Source: tablespoon.com

Friday, November 21, 2014

Pavlova Christmas Wreath

Christmas Pavlova Wreath with Strawberries and Berries
Luscious wreath-shaped pavlova with cherries and berries

Serves: 8

Ingredients:

4 egg whites
pinch of salt
115g caster sugar
2 teaspoons cornflour
1 teaspoon vanilla essence
1 teaspoon malt vinegar
300ml cream
500g fresh berries and cherries

Directions:

Cut a length of baking paper about 90xm x 10cm wide. Make into a circle standing on its edge and secure with paper clips. The circle needs to be 25cm diameter. Cut another length of paper to form a smaller circle of 8cm diameter. Line a baking tray with baking paper and place the large circle.

Beat the egg whites and salt until peaks form. Add the sugar a little at a time while beating until very thick and glossy. Sieve in the cornflour and gently fold in along with the vanilla and vinegar.

Spoon the mixture around the inside of the large paper ring to form a ring shape. At this point nestle the smaller rink in the center to help get an even ring.

Place in the oven and immediately reduce the temperature to 120°C. Bake for 2 hours. Remove from the oven and cool.

Very carefully remove the baking paper from the pavlova and place the pav on a plate. Whip the cream to soft peaks and spoon over the pavlova then arrange the berries and cherries on top.

Source: cuisine.co.nz
Christmas Berry Pavlova Wreath

Berry Christmas Pavlova Wreath
This Berry Christmas Pavlova tastes as good as it looks and will be the highlight of your table! This stunning dessert is sure to impress your friends and family.

Ingredients:

Pavlova
  1. 4 eggs whites (at room temperature)
  2. Pinch of salt
  3. 250g castor sugar
  4. 2 tsp of cornflour (sifted)
  5. 1 tsp white wine vinegar
Raspberry Coulis
  1. 125g fresh raspberries
  2. Juice 1/2 lemon
  3. 1/4 cup castor sugar
  4. 1/2 tsp of brandy (optional)
Topping
  1. 300ml fresh cream – whipped
  2. 1 x pomegrante
  3. Raspberries, cherries and strawberries to decorate
  4. Bunch of holly or fresh mint
Directions:
  1. Preheat oven to 120C. Line a tray with baking paper. Use a round baking tin to draw one large circle (22cm) then draw another circle inside it approximately 13cm wide.
  2. Beat egg whites and salt until soft peaks form. Beat in sugar, a little at time until meringue is stiff and shiny.  Sprinkle over sifted cornflour, vinegar and fold in lightly.You should be able to up end the bowl at this stage with no fear of anything coming out.
  3. Grab a dessert spoon and scoop a dollop of meringue. Place this dollop between the outside and inside line. Repeat until a ring of meringue is complete. Create a second layer of meringue on top of the first until second ring is complete. Flatten the top by smoothing the meringue.
  4. Place meringue in oven for 2 hours at 120C. When time is complete, turn off the oven and leave meringue in the oven until completely cool. This is very important as there will be less risk of the meringue cracking and collapsing.
  5. When cool, spread with whipped cream, drizzle on raspberry coulis then decorate with cherries, pomegranates, strawberries, raspberries and holly or mint.
Raspberry Coulis
  1. Blend fresh raspberries, lemon juice and sugar together until sugar has completely dissolved. Set aside until required.
  1. Make sure egg whites are at room temperature  - not straight from the fridge – it makes it hard to whip to right consistency
  2. Add ingredients to meringue in small amounts and consistently as per recipe
  3. Do not open oven while pavlova is baking
  4. Do not take pavlova physically out of oven until completely cool
Even if you have a mini disaster with this, the beauty of Pavlova is that you can cover it up with lashings of fresh cream and your guests will be none the wiser!
 
Merry Christmas!

Source: mysquarefryingpan.com

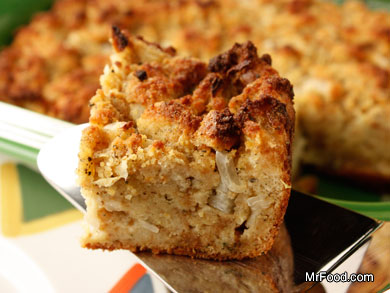
Sage Corn Bread Dressing


Use those day-old leftover corn muffins to make a go-along that's perfect for matching up with roast turkey. And if you drizzle the pan drippings over this, you'd better be ready for some real hearty eating! 

Ingredients:

  • 6 cups coarsely crumbled corn muffins (see Note)
  • 4 slices white bread, torn into small pieces
  • 1 medium-sized onion, chopped
  • 1/3 cup butter, melted
  • 1 tablespoon rubbed sage
  • 1/2 teaspoon black pepper
  • 2 eggs, beaten
  • 3 1/2 cups chicken broth
  •  
    Directions:
    1. Preheat oven to 425 degrees F. Coat an 8-inch square baking dish with cooking spray, set aside.
       
    2. In a large bowl, combine crumbled muffins, bread pieces, onion, butter, sage, and pepper. Add eggs and broth to mixture, stirring until well combined.
       
    3. Pour into baking dish. Bake 50 to 55 minutes, or until dressing is golden and edges are set.
    Notes:
    Six corn muffins (16 ounces total) will yield 6 cups crumbled; if you prefer, just crumble cornbread.
     
    Source:  mrfood.com

    Friday, February 14, 2014

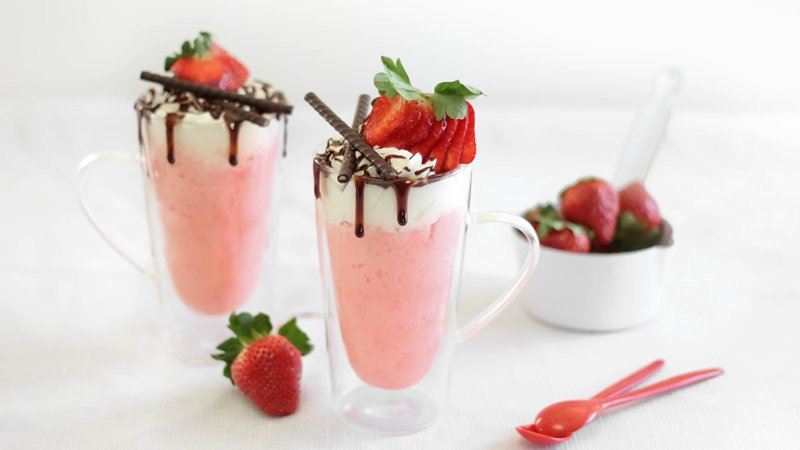
    Microwave Strawberry Cream Mug Cake For Two

    Microwave Strawberry Cream Mug Cake for Two
    Ingredients:

    Cakes:

    6        tablespoons Betty Crocker® SuperMoist® white cake mix
    1        egg
    2        tablespoons milk
    1        tablespoon vegetable oil
    1        tablespoon strawberry-flavored gelatin
    1        tablespoon hot water

    Strawberry Cream Syrup:

    1/4     cup milk
    2        tablespoons sweetened condensed milk (not evaporated)
    1        tablespoon strawberry-flavored gelatin

    Toppings:

    1/2     cup whipped topping
    2        tablespoons chocolate-flavored syrup
    2        fresh strawberries
    4        chocolate sticks

    Directions:
    • 1. Lightly grease 2 (14- to 16-oz) mugs with vegetable oil using paper towel.
    • 2. In medium bowl, place cake mix. With whisk, beat in egg, 2 tablespoons milk and 1 tablespoon oil. In small cup, dissolve 1 tablespoon gelatin in hot water. Beat into cake batter. Divide batter evenly between mugs, about 1/2 cup in each mug.
    • 3. Microwave mugs on High 30 seconds. Let stand 5 seconds. Microwave on High 30 seconds longer. Let stand 5 seconds. Cake is done when toothpick inserted in center comes out clean.
    • 4. Using bamboo skewer or sharp knife, gently poke several holes in each mug cake.
    • 5. To make Strawberry Cream Syrup, in small microwavable bowl, beat both milks with whisk to blend. Microwave on High 30 seconds or until hot. Beat in 1 tablespoon gelatin. Pour half of the cream syrup over each cake. Let cake stand 2 minutes or until cream syrup is absorbed.
    • 6. Top each cake with 1/4 cup whipped topping; drizzle each with 1 tablespoon chocolate syrup. Garnish each cake with 1 strawberry and 2 chocolate sticks. Serve immediately. Store in refrigerator.

    Expert Tips:

    If cakes are not done after a total of 1 minute of microwaving on High, microwave for an additional 15 seconds on High.

    Using clear glass mugs will show off the pretty pink color of the strawberry cake.

    Source: bettycrocker.com

    Tuesday, February 4, 2014

    Chocolate Pistachio Heart Cookies

    Chocolate Pistachio Heart Cookies
    Vary the shape of these chocolate-dipped cookies depending on the season.

    Ingredients:
    • 2/3  cup packed brown sugar
    • 1   cup butter
    • 1   teaspoon vanilla
    • 1   beaten egg
    • 2 1/4  cups all-purpose flour
    • 1/4  cup unsweetened cocoa powder
    • 3/4  cup finely chopped pistachio nuts
    • 3/4  cup semisweet chocolate pieces
    • 1   tablespoon shortening
    • 1/2  cup ground pistachio nuts
    Directions:

    1. In a medium saucepan combine the butter and brown sugar. Heat and stir over low heat until butter is melted. Remove saucepan from heat; stir in vanilla. Cool mixture 15 minutes. Stir in beaten egg, flour, and cocoa powder until combined. Stir in the 3/4 cup pistachio nuts. Divide dough in half. Cover and chill about 30 minutes or until dough is easy to handle.
    2. On a lightly floured surface, roll half of dough at a time to 1/4-inch thickness. Using a 2-inch heart-shape cookie cutter, cut out cookies. Place cookies 1 inch apart on an ungreased cookie sheet.
    3. Bake in a 350 degree F oven about 9 minutes or until edges are firm. Transfer cookies to a wire rack; cool.
    4. In a small heavy saucepan heat and stir chocolate pieces and shortening over low heat until melted. Remove from heat. Dip half of each cookie into chocolate mixture; roll edges of cookie in ground pistachio nuts. Makes about 48 cookies.
     
    Source:  bhg.com

    Monday, January 6, 2014

    Mrs. Billett's White Cake


    We don't remember who Mrs. Billet is, but she's a cake-lover's best friend. Use a heavy-duty electric stand mixer for best results. Also, lining the bottoms of the pans with parchment paper ensures that the layers come out of the pans with ease.

    Ingredients:
    • Parchment paper
    • 1 cup milk
    • 1 1/2 teaspoons vanilla extract
    • 1 cup butter, softened
    • 2 cups sugar
    • 3 cups cake flour
    • 1 tablespoon baking powder
    • 5 egg whites
    • Vanilla Buttercream Frosting
    • Garnish: fondant snowflakes

    Directions:

    1. 1. Preheat oven to 350°. Grease 3 (8-inch) round cake pans; line bottoms with parchment paper, and grease and flour paper.
    2. 2. Stir together milk and vanilla.
    3. 3. Beat butter at medium speed with a heavy-duty electric stand mixer until creamy; gradually add sugar, beating until light and fluffy. Sift together flour and baking powder; add to butter mixture alternately with milk mixture, beginning and ending with flour mixture. Beat at low speed just until blended after each addition.
    4. 4. Beat egg whites at medium speed until stiff peaks form; gently fold into batter. Pour batter into prepared pans.
    5. 5. Bake at 350° for 20 to 23 minutes or until a wooden pick inserted in center comes out clean. Cool in pans on wire racks 10 minutes. Remove from pans to wire racks; discard parchment paper. Cool completely (about 40 minutes).
    6. 6. Spread Vanilla Buttercream Frosting between layers (about 1 cup per layer) and on top and sides of cake.

    Thursday, December 19, 2013

    Lemon-Cranberry Cake

    Lemon-Cranberry Cake
    Layers of cake, frosting, and fresh cranberry sauce make this a fantastic holiday dessert. But keep a package of fresh cranberries in the freezer so you can make this treat any time of the year.

    Ingredients:
    • Cake:
    • 3   cups all-purpose flour
    • 1   tablespoon baking powder
    • 1   cup (2 sticks) unsalted butter, at room temperature
    • 2   cups sugar
    • 4   large eggs
    • 3/4  cup milk
    • 1/2  cup fresh lemon juice (about 4 lemons)
    • 1   teaspoon vanilla extract
    • 1   tablespoon grated lemon rind
    •  
      Filling:
    • 1   bag (12 ounces) whole cranberries
    • 1   cup sugar
    • 1   tablespoon fresh lemon juice
    •  
      Icing:
    • 2   large egg whites
    • 1 1/2  cups sugar
    • 1/8  teaspoon salt
    • 1/2  cup water
    • 1   tablespoon corn syrup
    • 1/2  teaspoon vanilla extract
    • 1/2  teaspoon lemon extract
    •  
      Sugared cranberries (see Note)
    •  
      Thinly sliced lemon, for garnish
       
      Directions:
       
      Cake:

      1.Heat oven to 350 degrees F. Grease and flour three 9-inch-round cake pans.
      2.In a medium-size bowl, stir together flour and baking powder.
      3.In large bowl, beat butter until smooth. Gradually beat in sugar until fluffy and light colored, 3 minutes. Beat in eggs, one at a time.
      4.In a measuring cup, whisk together milk, lemon juice and vanilla.
      5.On low speed, alternately beat flour mixture and milk mixture into butter mixture, ending with flour. Stir in lemon rind. Divide batter evenly among prepared pans.
      6.Bake in 350 degree F oven until tops spring back when lightly pressed, 25 minutes. Let cake layers cool in pans on rack 10 minutes. Invert cakes onto rack; remove pans. Let cool.
       
      Filling:

      1.In saucepan, combine cranberries, sugar and lemon juice. Bring to simmering over medium-high heat; cook, stirring, until berries pop and mixture thickens slightly, 5 minutes. Scrape into sieve over bowl; press through sieve, discarding seeds and solids. You should have 1 cup filling. Let cool to room temperature.
       
      Icing:

      1.In heavy-bottomed saucepan, combine egg whites, sugar, salt, water and corn syrup. Beat on medium-high speed with a hand mixer over medium-low heat until icing is thick, pure white and fluffy (soft, shiny peaks), about 7 to 9 minutes. Remove pan from heat. Add extracts; beat until very thick, 1 minute.
      2.Place one cake layer on serving plate. Top with half the filling, leaving 1/2-inch border around edge. Top with 3/4 cup icing. Repeat with second cake layer, remaining filling and 3/4 cup icing. Top with remaining cake layer. Spread remaining icing over sides and top of cake. Garnish with sugared cranberries and lemon slices just before serving, if desired. Makes 16 servings.
       
      Source:  recipe.com

    Monday, December 2, 2013

    Cheesy Sausage And Egg Bake


    Ingredients:

    1. 1          pound bulk pork sausage, cooked and drained*
    2. 1 1/2    cups sliced fresh mushrooms (4 ounces)
    3. 8         medium green onions, sliced (1/2 cup)
    4. 2         medium tomatoes, seeded, chopped (1 1/2 cups)
    5. 2         cups shredded mozzarella cheese (8 ounces)
    6. 1 1/4   cups Original Bisquick® mix
    7. 1         cup milk
    8. 1 1/2   teaspoons salt
    9. 1 1/2   teaspoons chopped fresh or 1/2 teaspoon dried oregano leaves
    10. 1/2      teaspoon pepper
    11. 12       eggs
    Directions:
    1. 1 Heat oven to 350°F. Grease rectangular baking dish, 13x9x2 inches. Layer sausage, mushrooms, onions, tomatoes and cheese in dish.
    2. 2 Stir remaining ingredients until blended. Pour over cheese.
    3. 3 Bake uncovered 30 to 35 minutes or until golden brown and set.
    Notes:
    1. *Chorizo or hot Italian sausage can be substituted.
    2. This bake can be made 8 to 12 hours ahead. Make as directed through step 2; cover and refrigerate. When ready to bake continue as directed in step 3, (bake time may be longer).

    Christmas Ball Cookies


    Ingredients:

    1. 1 1/4   cups butter, softened
    2. 1 1/2   cups powdered sugar
    3. 1/8      teaspoon salt
    4. 1/2      teaspoon almond extract
    5. 2         cups Gold Medal® all-purpose flour
    6. Red, green and white sanding sugar
    7. 1        tablespoon milk
    Directions:
    1. 1 In large bowl, beat 1 cup of the butter, 1/2 cup of the powdered sugar and the salt with electric mixer on medium speed about2 minutes or until creamy. Beat in 1/4 teaspoon of the almond extract. On low speed, beat in flour just until combined. Cover; refrigerate 30 minutes.
    2. 2 Heat oven to 350°F. Line cookie sheets with cooking parchment paper. Shape dough into 48 (3/4-inch) balls. Roll 16 balls in each color of sanding sugar, coating completely. On cookie sheets, place balls 1 inch apart.
    3. 3 Bake 15 minutes or until set and bottoms are light golden brown. Remove from cookie sheets to cooling racks. Cool completely, about 30 minutes. In small bowl, beat remaining 1/4 cup butter, 1 cup powdered sugar, 1/4 teaspoon almond extract and the milk with electric mixer on medium speed until smooth. For each sandwich cookie, spread about 1/2 teaspoon filling on bottom of 1 cookie; top with second cookie, bottom side down, to form ball.
    Notes:
    1. You'll want to use butter rather than a substitute for this recipe. Carefully measure flour and powdered sugar by lightly spooning into a measuring cup and leveling off. Scooping flour can cause dry, tough dough.
    2. You may omit the filling for these sandwich cookies and simply serve them as colorful sugar cookies.

    Christmas Vanilla Roll Cake


    A simple vanilla roll cake with red and green dots and spirals of creamy butter cream is the perfect dessert for Christmas parties.

    Ingredients:

      Vanilla Roll Cake:
       
    • 2 eggs
    • 3 egg yolks
    • 1/2 cup (100 grams) sugar
    • 1 teaspoon vanilla extract
    • 1/3 cup (30 grams) sifted cake flour
    • 3 tablespoons (30 grams) cornstarch
    • 1/4 cup red & green Wilton batter bits (found at WalMart)
    • 2 egg whites
    • 1 tablespoon sugar 
    •  
    • Vanilla Buttercream:

    • 3 cups (360 grams) powdered sugar
    • 3-4 tbsp red & green sprinkles
    • 1 teaspoon vanilla extract
    • 1-3 teaspoons heavy cream 
    •  
    •  Decorations:
    •  
    • 4 oz white chocolate
    • red & green sprinkles
    •  1 cup Land O'Lakes butter, room temperature
    Directions:
    1. Heat the oven to 450F.
    2. Line a 17X12" jelly pan with parchment paper. Set aside.
    3. In a mixing bowl add the 2 eggs, 3 egg yolks and 1/2 cup sugar. With the paddle attachment on, beat on medium to hight speed 3-5 minutes until pale in color and thickened. Add the vanilla extract and beat few more seconds.
    4. Sift the flour and the cornstarch over the egg yolks mixture and with a spatula gently fold it in.
    5. Fold in the batter bits as well.
    6. In a separate grease free bowl, add the 2 egg whites and 1 tablespoon of sugar. With a whisk, whip until firm peaks form.
    7. With the spatula, fold the whipped egg whites into the egg yolks mixture.
    8. Pour the cake batter into the prepared pan, spread it evenly and bake for 6-7 minutes until golden brown and, when touched, it springs back.
    9. As soon as you remove the cake from the oven sprinkle with powder sugar and then invert the cake onto a clean dish towel. Remove the parchment paper, sprinkle with more powder sugar, and roll up the cake with the towel. Place on a wire rack to cool
    10. Vanilla butter cream
    11. In a clean bowl add the butter. With the whisk attached on to the the mixer whip the butter for 2-3 minutes on medium to high speed.
    12. Lower the speed and slowly add the sugar, 1/2 cup at a time.
    13. When all the sugar is incorporated increase the speed and whip for 2 more minutes.
    14. Add few drops of heavy cream until it reaches the consistency you desire.
    15. With a spatula fold in the sprinkles.
    16. Gently unroll the cake and spread the butter cream evenly all over it.
    17. Roll it again and place in the fridge for a couple of hours.
    18. To decorate, melt the white chocolate in double boiler or microwave and pour it over the cake. Add Add more sprinkles (optional)
    19. Let the chocolate settle for few minutes and slice the cake.
     Source: roxanashomebaking.com

    Thursday, November 14, 2013

    Maple Orange-Glazed Turkey Roast


    Use an instant-read thermometer to determine when the turkey is ready. Cooking the bird on the grill adds a smoky taste. 

    Ingredients
    • 1   clove garlic, minced
    • 1   tablespoon snipped fresh marjoram or 1 teaspoon dried marjoram, crushed
    • 1/4  teaspoon salt
    • 1/4  teaspoon pepper
    • 3/4  cup orange juice
    • 1   tablespoon cornstarch
    • 1/2  cup maple syrup
    • 1   teaspoon finely shredded orange peel
    • 1  2 1/2 - 3 1/2 pound boneless turkey roast
    •  2   tablespoons butter, melted
       
      Directions
       
      1. In a small bowl combine garlic, marjoram, salt, and pepper; set aside. For glaze, in a small saucepan stir together the orange juice and cornstarch; add half of the seasoning mixture. Cook and stir over medium heat until thickened and bubbly. Cook and stir 1 minute more. Stir in maple syrup and orange peel; set aside.
      2. Brush the turkey roast with melted butter and rub with remaining seasoning mixture. Insert a meat thermometer near the center of the roast.
      3. For a charcoal grill, arrange medium-hot coals around a drip pan. Test for medium heat above the pan. Place the turkey roast directly on the grill rack over the pan. Cover; grill for 2 to 2-1/2 hours or until thermometer registers 165F. Add coals to maintain heat every 30 minutes. Brush with glaze the last 30 minutes of grilling. Remove meat from grill. Cover with foil; let stand for 15 minutes before carving. (The meats temperature will rise 5F during standing.) Bring any remaining glaze to boiling; pass with turkey. (For a gas grill, preheat grill. Reduce heat to medium. Adjust for indirect cooking. Grill as above.)
       
      Servings: 10 to 12
      Prep Time: 20 mins

     Source: Recipe.com

    Buffalo-Style Chicken Fingers


    Love wings but not the mess of preparing and cooking them? Substitute this neat-to-eat chicken breast version, which can be made ahead, frozen, and reheated.

    Ingredients:
    •  1   cup crushed corn flakes
    •  1   tablespoon finely snipped parsley
    •  1/4  teaspoon salt
    •  1   pound skinless, boneless chicken breasts
    •  1/3  cup bottled blue cheese salad dressing
    •  2   teaspoons water
    •  1 - 2   teaspoons bottled hot pepper sauce
    •  Celery sticks
    •  Bottled blue cheese salad dressing
       
      Directions:
       
      1. Combine crushed corn flakes, parsley, and salt in a shallow bowl or pie plate. Cut chicken breasts into strips about 3/4 inch wide and 3 inches long. Combine the 1/3 cup dressing, water, and hot pepper sauce in a large mixing bowl. Add chicken; stir to coat. Roll chicken pieces individually in crumb mixture to coat. Place strips on a foil-lined baking sheet. Freeze until firm, about 2 hours.
      2. To serve, heat oven to 425 degree F. Place frozen chicken strips in a single layer in a lightly greased 15x10x1-inch baking pan. Bake for 18 to 20 minutes or until meat is no longer pink in center and crumbs are golden. Serve warm with celery sticks and additional blue cheese dressing for dipping. Makes 12 servings.
       
      Make Ahead Tip Make Ahead Tip Place frozen strips in a freezer container. Cover and freeze up to 1 month.
       
      Source: bhg.com

    Monday, September 9, 2013

    Peanut Butter Christmas Trees


    Ingredients:

    Each tree requires:

    2 mini PB cups,
    1 snack size PB cup 
    1 chocolate kiss
    White Chocolate Pieces

    Directions:

    Melt the white chocolate (this will be the “glue” that holds each layer together) and put it in a squeeze bottle or ziptop bag with a tiny cut off corner. 

    Set up an assembly line …

    • Tree trunk – upside down mini PB cup – white chocolate “glue”
    • 1st layer – upside down snack size PB cup – drizzle white chocolate around the edges & sprinkle with non-pariels
    • 2nd layer – upside down mini PB cup – repeat drizzle & sprinkle
    • 3rd layer – chocolate kiss – repeat drizzle & sprinkle
    Each tree requires … 2 mini PB cups, 1 snack size PB cup & 1 chocolate kiss

    Source: Sweetsimplestuff.com

    Sunday, September 8, 2013

    A Christmas Fruit Tree

    undefined
    Ingredients:

    Apples
    1 Carrot
    toothpicks
    Pineapple
    Strawberries
    Oranges
    Grapes
    Pears
    Lemons
    Kiwi
    Berries


    Directions:

    • Cut the core out of an apple and put upside down. This will be your base.
    • Stick a carrot in the hole.
    • Place toothpicks in the carrot.
    • Attach fruit to the tooth picks. Use pineapple, strawberry, oranges, grapes, apple, pears, citrus bundles, kiwi and berry bundles.
    • Garnish with parsley or another leafy herb.
    Source: Flicker